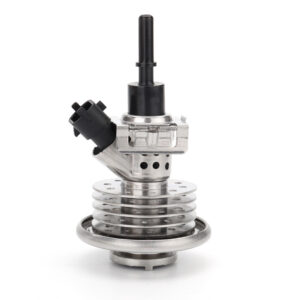
Mastering the Doser Valve Cleaning Process: An In-Depth Guide
Understand the Importance of Doser Valve Cleaning
The doser valve is crucial in diesel engines, regulating the precise amount of fuel entering the combustion chamber. This valve is essential for maintaining optimal air-fuel mixture ratios, which are vital for efficient engine performance and emissions control. However, soot, carbon deposits, and other contaminants can clog the doser valve over time. Therefore, regular maintenance and cleaning are necessary to ensure optimal engine functionality.
Neglecting doser valve cleaning can lead to several detrimental consequences:
- Decreased Engine Efficiency: A clogged doser valve disrupts fuel flow, resulting in inefficient combustion and reduced overall engine performance.
- Increased Emissions: A malfunctioning doser valve can lead to higher emissions due to unburnt fuel, contributing to pollution and potentially causing failure in emissions tests.
- Higher Maintenance Costs: Ignoring valve cleaning may cause frequent breakdowns and expensive repairs, ultimately affecting the vehicle’s longevity.
Conversely, maintaining a clean doser valve brings significant benefits:
- Improved Fuel Economy: A well-functioning doser valve optimizes fuel delivery, enhancing overall mileage.
- Enhanced Engine Performance: Regular cleaning promotes efficient combustion, resulting in smoother engine operation and responsiveness.
- Longer Engine Life: Keeping the doser valve clean minimizes wear on engine components, promoting longevity and reliability.
In summary, prioritizing doser valve cleaning is not solely about immediate performance; it’s an investment in the long-term health of your diesel engine.
Symptoms of a Clogged Doser Valve
Recognizing the symptoms of a clogged doser valve is essential for maintaining optimal performance in various industrial applications. A clogged doser valve can cause inefficiency, leading to increased downtime and operational costs. Identifying warning signs early can save both time and resources.
Here are common symptoms indicating that your doser valve may require cleaning:
- Inconsistent Dispensing: Irregularities in the material being dispensed, such as reduced flow or uneven amounts, are key indicators of potential clogging.
- Increased Pressure: Elevated pressure readings in your system may signal that the doser valve is obstructed, complicating smooth material passage.
- Unusual Sounds: Listen for grinding or chattering noises from the doser valve; such sounds may indicate the mechanism struggles to operate due to blockage.
- Visual Inspection: A simple visual check of the doser valve can reveal signs of build-up or residue, highlighting the need for thorough cleaning.
Moreover, diagnosing specific issues based on performance is crucial. If the valve fails to dispense the specified amount of product, investigate the doser valve’s condition. Additionally, be mindful of fault codes generated by your system’s control panel, which can give vital clues about doser valve functionality:
- Error Code 001: Indicates low flow due to clogging.
- Error Code 002: Signals a potential blockage within the dosing mechanism.
- Error Code 003: Suggests pressure inconsistencies related to material delivery.
By staying aware of these symptoms, you can proactively maintain your doser valve for continuous, efficient operation.
Step-by-Step Guide to Cleaning Your Doser Valve
Understanding the significance of maintaining your doser valve is vital for optimal performance and longevity. This section provides a clear, step-by-step guide to effectively clean your doser valve, ensuring its smooth operation.
Necessary Tools and Materials:
- Soft-bristled brush
- Warm soapy water
- Non-abrasive cleaning cloths
- Small container for soaking
- Safety goggles
- Latex gloves
Step-by-Step Cleaning Procedure:
- Preparation: Ensure the machine is turned off and unplugged before starting. Wear safety goggles and latex gloves for protection.
- Disassembly: Carefully remove the doser valve according to the manufacturer’s instructions, placing components in a small container for soaking.
- Soaking: Fill the container with warm soapy water and soak the valve components for about 15 minutes to loosen residue.
- Brush and Clean: Use the soft-bristled brush to gently scrub all valve surfaces, focusing on hard-to-reach areas where powder may have accumulated. Rinse thoroughly with clean water.
- Drying: Wipe the components with a non-abrasive cleaning cloth and allow them to air dry completely before reassembly.
- Reassembly: Once dry, carefully reassemble the doser valve per the manufacturer’s guidelines.
Safety Precautions: Always power down the equipment before cleaning. Use gloves and goggles to avoid contact with cleaning agents or residual powder. Additionally, maintain a clean work environment to prevent contamination.
By adhering to these steps, you ensure your doser valve remains in peak condition, contributing to the overall efficiency of your equipment.
DIY vs. Professional Cleaning: Pros and Cons
When considering cleaning doser valves, one of the first decisions is whether to tackle the job yourself or hire a professional service. Each option has advantages and disadvantages that can significantly affect both the cleaning quality and your overall costs.
From a cost perspective, DIY cleaning may initially seem more budget-friendly. Basic supplies, such as brushes, cleaning solutions, and safety equipment, typically range from $20 to $100, depending on the tools needed. In contrast, professional cleaning services may cost anywhere from $150 to $300 for the same task. However, this initial price difference can be misleading.
Here are key benefits and drawbacks to consider:
- DIY Benefits:
- Cost-effective, especially for simple cleaning tasks.
- Convenience to clean at your own schedule without waiting for a service appointment.
- Opportunity to learn and gain hands-on experience that could be beneficial in the long run.
- Professional Help Benefits:
- Expertise and experience lead to a more thorough and efficient cleaning process.
- Access to specialized equipment and cleaning products often unavailable for personal use.
- Reduced risk of damaging the doser valve through improper cleaning techniques.
Ultimately, the decision between DIY and professional cleaning should depend on various factors, including your familiarity with the cleaning process, the task’s complexity, available time, and your budget. If the doser valve is severely clogged or if you are uncertain about the cleaning method, investing in professional services is often the best choice for ensuring optimal performance.
Checklist for Regular Doser Valve Maintenance
To maintain your doser valve effectively, incorporate essential maintenance tasks into your routine to ensure optimal performance and longevity. The following checklist provides a comprehensive guide for doser valve maintenance.
- Visual Inspection: Regularly inspect the doser valve for any signs of wear, leaks, or corrosion. This should be done monthly.
- Cleaning: Clean the valve body and surrounding areas using a suitable solvent to remove any debris build-up. Aim for this at least every 500 operating hours.
- Sealing Check: Examine the valve seals for damage or degradation and replace any worn seals immediately to avoid malfunctions. Perform this check quarterly.
- Lubrication: Apply appropriate lubricant to the moving components of the doser valve to ensure smooth operation every 1,000 operating hours.
- Functional Testing: Run a functional test of the valve system to ensure it operates as intended; conduct this test with each maintenance session.
- Record Keeping: Maintain a log of all maintenance activities, including dates, tasks performed, and replacements made, to track the valve’s history and allow for proactive management.
Regular maintenance, as outlined in this checklist, helps keep your doser valve functioning at peak performance. Adopting a disciplined upkeep approach not only enhances efficiency but also significantly reduces the risk of unexpected failures.
Frequently Asked Questions (People Also Ask)
To further clarify the doser valve cleaning process, it is important to address some common questions that highlight its importance and maintenance. Here are answers to frequently asked queries:
- How often should I clean my doser valve?
It is generally recommended to clean your doser valve every 400-500 operational hours or at least once a year, depending on usage and operating conditions. - What are the signs of a clogged doser valve?
Signs of a clogged doser valve include inconsistent fuel delivery, engine misfires, reduced power output, or noticeable leakage around the valve area. - Can I clean the doser valve myself, or should I hire a professional?
While experienced individuals can clean a doser valve themselves, hiring a professional is advisable for those unfamiliar with the process to avoid potential damage. - What tools do I need to clean the doser valve effectively?
Essential tools for this task include a wrench set, cleaning brushes, a vacuum, degreaser solution, safety goggles, a soft cloth, and a torque wrench for reassembly. - What happens if I ignore a clogged doser valve?
Neglecting a clogged doser valve can lead to severe performance issues, increased emissions, reduced fuel efficiency, and ultimately, engine damage if not addressed promptly.
Regular maintenance and timely intervention are critical to ensuring the optimal performance and longevity of your engine’s doser valve.